<a href="http://www.bloglovin.com/blog/5884165/?claim=t88azavjavu">Follow my blog with Bloglovin</a>
Welcome to the Quilts in the Pumpkin Patch Blog Hop.
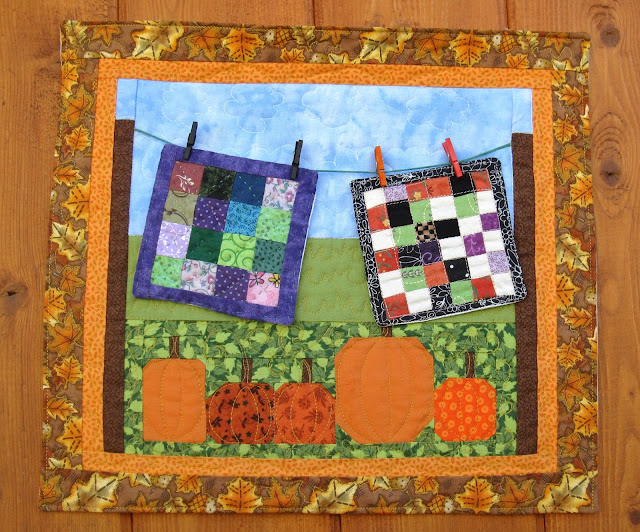 Would you like to make a Quilts in a Pumpkin Patch wall hanging?
THE FIRST HOP STOP IS RIGHT HERE!
 |
| Hello Kitty Mug Rug |
FOR THE TUTORIAL, CLICK ON READ MORE.
For the other Hop Projects click on the links below:
There are just 3 Parts to make: The Tiny Quilts, the Pumpkin Patch, the Borders and finishing up. Here is the tutorial:
STEP I. THE TINY QUILTS
 |
| 1. Start with 1 inch strips and sew pairs of two together, (keep strips long). Square off ends (GO TO READ MORE for more of this tutorial) |
 |
| 2. Sew the squared ends together (it's easier to work with these small pieces if you do it this way) |
 |
| 3. Lay your ruler down so the diagonal line on the ruler goes through the center and cut so you have a 1 1/2 inch square "4 patch". Make 4 of these and sew 2 together and then those two together to form a 3 1/2 inch tiny quilt ready for it's borders. |
 |
4. Add 3/4 inch borders and square it up.
|
5. Sew right sides together, leaving a a 2 inch opening (to pull the right sides back out again), press, and stitch the opening closed.
NOTE: In this tiny quilt, I included batting, but on subsequent
little quilts, I didn't use batting because it's slightly puffy looking, but you could if you want-- it's your
choice. Also on the other little quilt you see on the line, I used 3/4" strips and made 4 tiny "9 patch" blocks for the quilt top.
 |
| In this photo, I wanted to show you this magnifying light I have mounted to my sewing table. I love it because sometimes it's so hard to thread a needle or pick something out and it's nice to have! |
 |
| 6. Quilting: I hand stitched an "X" through each little block and around the border (as seen here through my lighted magnifier). On all the other little tiny quilts, I just "quilted" by machine. |
STEP II: THE PUMPKIN PATCH
 |
1. Cut squares or rectangles for your pumpkins.
One 3 inch square
Three 2 inch squares
One 2 x 2 1/2" rectangle. Use 1" (or 3/4 inch) squares of the fabric you've chose for your pumpkin patch background to "snowball" the corners-- you can see that I marked the bottom two squares with a diagonal line to sew on (or you could just fold it and sew on your folded line)
Note: On some of my pumpkin bottoms, I didn't snow ball it but left it square, to make the pumpkins less uniform in shape. Also you could put less pumpkins in your "patch" if you want to. |
 |
2. Pumpkin stems: Out of brown cut 3/4 x 1" pieces-- actually a better method just occurred to me. Cut two strips of green 1 3/4" x 5 1/2" and out of brown, cut a strip 3/4" x 5 1/2". Sew the two green strips to each side of the brown strip. Press. |
 |
| 3. Cut five, 1inch sections -- one for the top of each pumpkin. Center the stem on top and sew the two pieces together for each of your pumpkin blocks. Press. Square up. |
 |
| 4. Add green fabric to the tops of the pumpkin blocks so they are all the same height as your largest pumpkin block (don't forget to add 1/2" for the seam allowance) . Press. Square Up. |
 |
| 5. Sew your Pumpkin blocks together. Press. Square up. |
 |
| 6. Side borders. Cut 3 1/4" x 1". Sew. Press. |
 |
| 7. Bottom border Cut green strip 9 3/4 x 1" (note: if you look closely, you'll see that I did the bottom and then the side borders, but because of the way I photographed it, I told you to do the side borders 1st. It doesn't matter, but the dimensions I gave you work for side borders 1st.) Sew. Press. Square up. |
 |
| 8. Top border: Cut 2 1/2" x 9 3/4" in a different color green to give the "patch" dimension and a horizon. Press. Square up. |
 |
| 9. Sky: Cut blue rectangle 4 1/2 x 9 3/4". Press. Square up. |
 |
| 10. Clothesline posts units: Cut 2 brown strips 1 x 8 1/2" Cut 2 blue strips: 1 x 1 1/2". Sew together. Press. |
 |
| 11. Putting in the clothes line: I used a twine like
thin cord but would recommend a perhaps a pearl cotton thick thread, or
something that when you sew across it, the stitches catch the line in to
keep it secure. As you sew the post units to the patch, make sure the
line is placed straight across from side to side, and sew it into the
seam allowance and then back and forth across the line to make it as
secure as possible. It will probably stretch a little so don't leave
much slack, if any. Note: I got my little clothespins at JoAnne's for $2.49 for 24 pins. |
STEP III: Borders and Finishing Up
 |
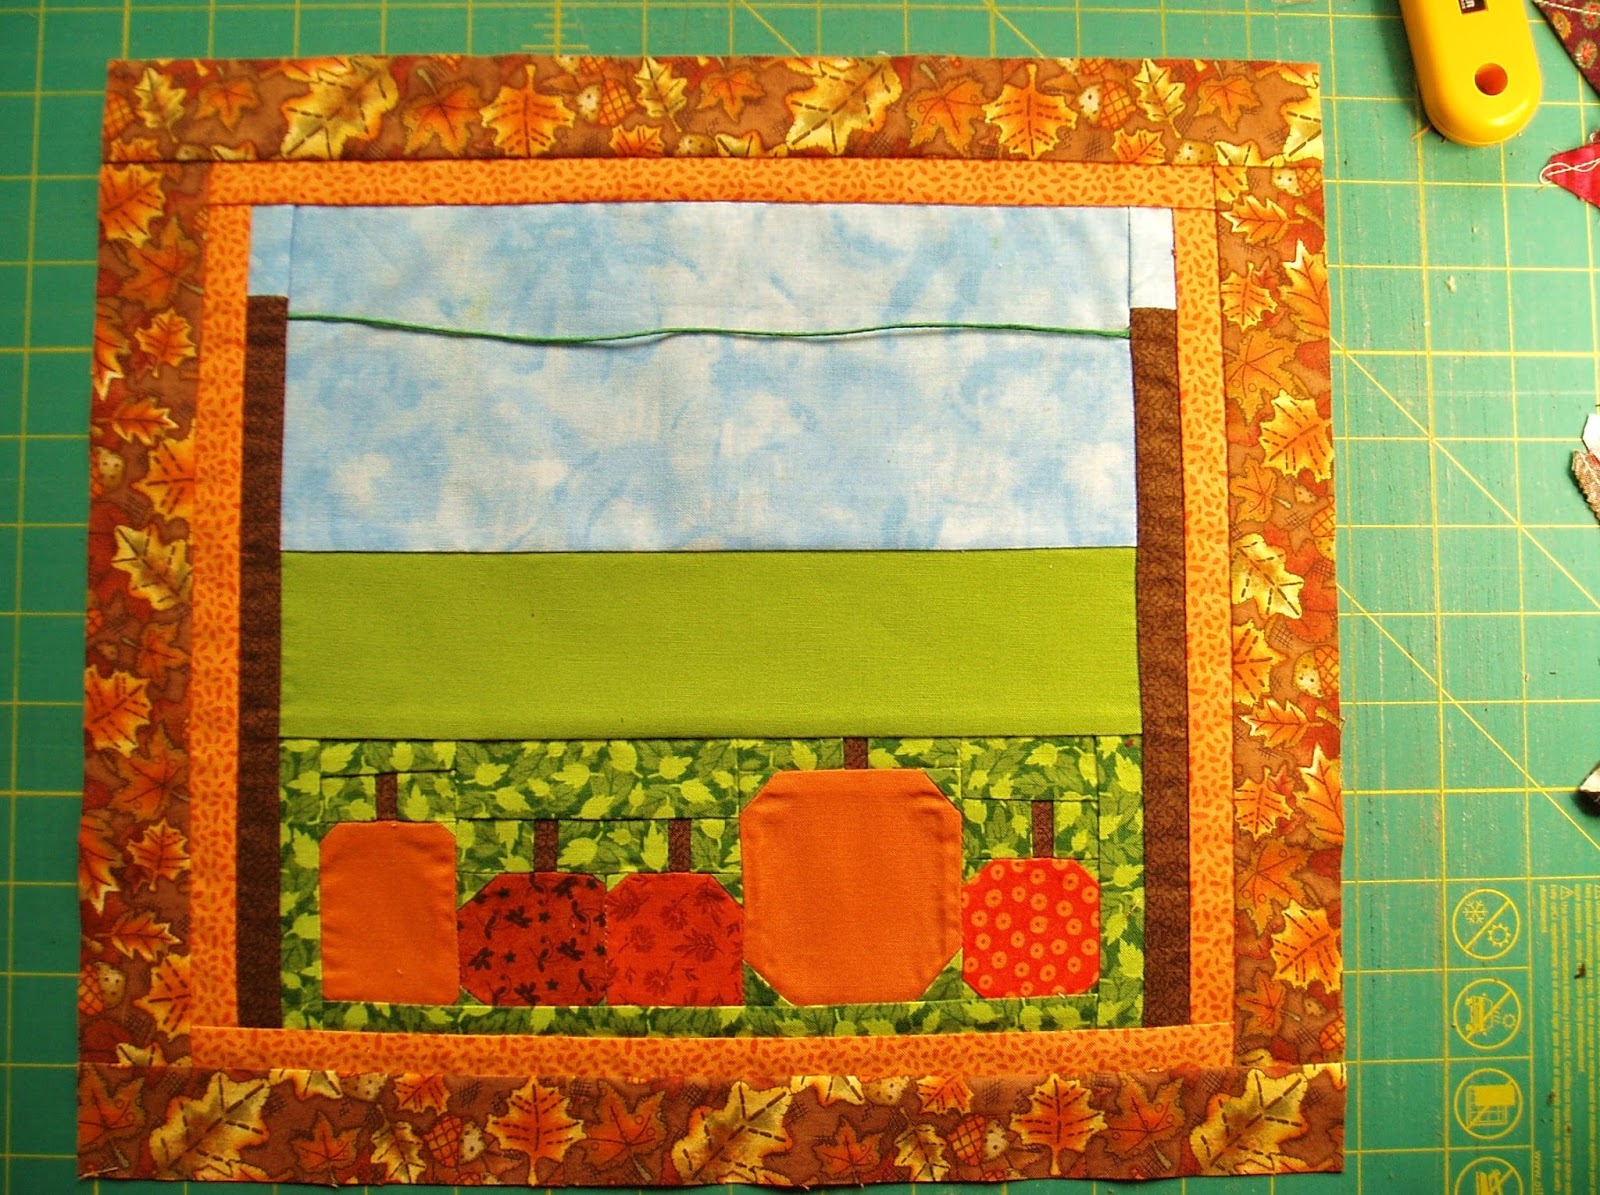
| 1. Square up your pumpkin patch and then add the borders. (Mine was 10 3/4 x 9 1/2" at this point.) The orange inside border is 1 x 9 1/2 " to sew to each side and 1 x 11 3/4" to sew next to the top and bottom. |
 |
| 2. The fall leaf outer border is 1 1/2" x 10 1/2" for each side (sew onto sides first) and 1 1/2 x 13 3/4" to sew onto the top and bottom. |
 |
| 3. Press and square up. |
 |
| 4. Cut a piece of batting and backing the same size as the front |
 |
| 5. Place the rights sides of the front and back together with the batting on the bottom. |
 |
| 6. Sew all the way around, leaving a 3" opening for turning the right sides out. Trim the batting right up to the stitching and trim the corners to reduce the bulk so the corners will be nice and square. |
 |
| 7. Turn Right sides out and Press and stitch up the opening. (As I press, I roll the backing back enough so I can see just a tiny bit of the front as you can see in the picture.) |
 |
| 8. Quilt it however you wish. I did some free motion on my regular sewing machine. Don't forget to add the little triangle corners that allow you to insert a dowel and hang with ease. |
 |
| 9. If you bind it, you don't have to finish the edges of the triangles, but if you use the turning right side out method, you need to press the edges in on your 3 inch square and then press in half and stitch onto the upper corners. |
 |
| Here you can see how I've inserted the dowel and hung it up on the fence with a push pin. |
I hope you've enjoyed this tutorial! Come back tomorrow to see Maggie's autumn surprise!


54 comments:
Sheri that is so cute. I love the clothes line. Great idea and tutorial!
Sheri that is so cute. I love the clothes line. Great idea and tutorial!
Oh my goodness! I love the quilts hanging in the pumpkin patch! That is just too cute. Great tutorial - thank you!
Very cute! Nice idea and great tutorial!
This is sooooo cute!! I am going to have to make one for myself! I love those little quilts hanging on the line....
Thanks for the excellent tutorial showing us how to make it!
It is a delight!!
Can't wait to see the whole week's projects!!
Susie
Pumpkin carving at my daughter's elementary school. Best school event ever!
This is so cute! your details are just perfect!
Thanks for linking up to Needle and Thread Thursday!
:) Kelly @ My Quilt Infatuation
What a great little pumpkin patch! Nice quilting too :)
Love your Pumpkin Patch!! Your tutorial is easy to follow. Love lots of pictures with tutorials. Thank you for sharing.
I love the little quilts hanging in the pumpkin patch and your beautiful mug rug. Thank you for the giveaway. My favorite thing to do in the Fall is to go to all the Festivals.
Very creative! I love it! Thanks for the tutorial. My favorite thing to do in Fall is sit on my porch swing in the evening hours sipping tea and enjoying the cooler temps with not bugs! Thanks for the giveaway chance. The mug rugs are adorable.
What a great kickoff to your blog hop! Looks like a fantastic lineup, and I'll be stopping by to see all of them How exciting! Those tiny quilts are so cute, and I adore that pumpkin patch!
Oh geez this is so adorable.
That is so cute! Love the 3D effect. I love making pumpkin bread and drinking apple cider. We love carving pumpkins with the grandkids. Thanks for the hop and the chance to win. Joyce
One of my favorite things for Fall is to go to the craft festivals around my area!
Thanks for the great tutorial for your pumpkin wallhanging. I also like going to fall festivals and craft fairs. This is going to be a great hop.
I love carving pumpkins, long walks in the crisp air and eating caramel apples:) Love your quilts! Thanks for the chance to win!
So cute!
What a great tutorial! I love collecting things in fall: food, leaves, things that drop of trees.
This little quilt is sooo cute. Love it! Your tutorial is excellent. Thank you for sharing.
Super cute quilt and fabulous tutorial.Thanks for sharing!
Love the clothes line and small pins, it adds so much! Excellent tutorial, thanks!
That is so stinkin' cute, I can't even begin to tell you how amazing this is! I adore the pumpkins, the quilting just makes them pop, oh my goodness, love it! Thank you so much for sharing it with us!
~Brandy
Oh, my favorite Autumn activity is Monday Night Football with my family.
also, my email:
brandizzle7133 at yahoo dot com
Thanks again!
Thanks so much for this tutorial! It's so cute that I have to make it right away even before I go shopping for the little clothespins. It's getting to feel like fall here so I'll be clearing out the veggie garden soon and I'm looking forward to spending more time in my sewing room again during the colder months.
That is so cute!! Now I'm scared of what my day will be after seeing your great tutorial. LOL
the clothes line is a wonderful touch of wimsy
Cute mini quilts love them hanging over the pumpkins. Favorite fall thing to do - make pumpkin pies. 24Tangent@gmail.com
I like going to pumpkin patches and cider mills.
smjohns63 at yahoo dot com
Adorable!
Oh Sheri, your project is wonderful! I love the mini quilts hanging on the line. So beautiful. And your mug rug are gorgeous, I know 2 little girls who would love love them what with the Hello Kitty fabric!
My favorite time of the year is fall, but don't have that season here, unfortunately. Love your quilt and the mini quilts are just too cute! Love it! :)
Such a cute little project, I love the mini quilts. I love kicking my way through the fallen leaves.
This is a great blog hop. Thanks so much for the cute tutorial too. My favourite thing to do in Autumn is to start baking lots of wonderful puddings and fruit crumbles.
ks(dot)eyles(at)yahoo(dot)co(dot)uk
I follow via Bloglovin.
ks(dot)eyles(at)yahoo(dot)co(dot)uk
It is a great project and tutorial! Thanks for organizing the hop! You went over the top with the giveaways too!
It is a great project and tutorial! Thanks for organizing the hop! You went over the top with the giveaways too!
It is a great project and tutorial! Thanks for organizing the hop! You went over the top with the giveaways too!
Hi Sheri. Just stopped by here again to look at your pumpkins and saw your update on the second chance to win one of your cute prizes. I follow you through GFC. I read your blog post on my blogger dashboard. Thanks for the extra chance to win.
I am sew happy I found this hop. I saw the post on Quilting Lines and tracked back. Fun theme. Thanks for hosting. I love the little quilts pinned to the clothesline and pumpkins in a line. Thanks for the tutorial ... :) Pat
I am a happy new follower via Bloglovin ... :) Pat
That is such a cute quilt! I love the ideal of having small quilts on the line like that! One of my favorite things to do in the fall is have a bon fire! We usually roast hot dogs and make some mores.
Love it!
That is so cute - you could even take the little quilts down when you need a coaster and put them back up to dry!
One of my favorite fall activities is making the kiddos warm clothes - a great excuse to sew!
I follow on bloglovin
Love the mini-quilts. they are so cute. I really like to see new projects or older techniques displayed in new ways to spark my interest. Thanks so much for sharing.
Quilts within a quilt - very cute!
Such a fun quilt. I love the little quilts on a line!
This is a cute mini.
Interesting work!
Great idea - I can see one of these in my future - a good excuse to see some more tiny quilts too!!
Love the details in this project. It is adorable. Thanks for the tutorial and for linking up at Handmade Halloween!
I just had to tell you that I love your Quilts in the Pumpkin Patch mini - and I plan on making one for myself and one for each of two daughters! Thanks so much.
Pauline
perry94022 at hotmail dot com
Post a Comment