Wednesday, March 15, 2023

Irish Chain Shamrock Mini


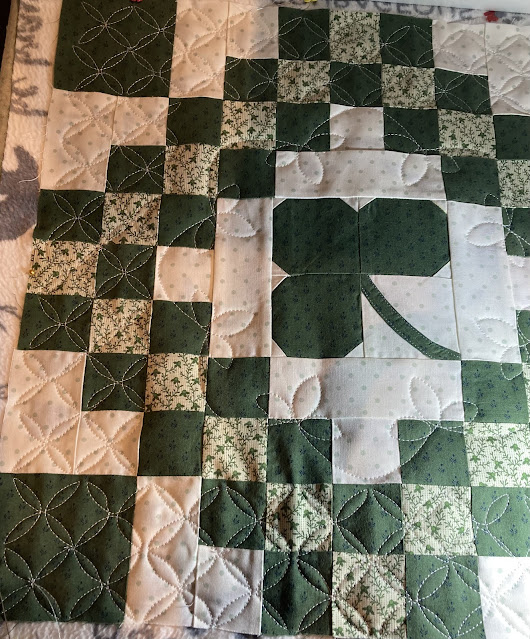
Finished up this little mini just in time for St. Patrick's Day.  I got this idea from my friend, Trish, who made one last year.  (You can see the triple Irish chain in process in the background.  I think it'll get done next year for sure.)


Here's a Tutorial in case you want to make one too.

Cutting Instructions
Cut: 
1. 2 inch strips to make the chains.  Total of 2" x 72" of dark green and 2" x 40" for the coordinating lighter green strip.
2.  (4) 3 1/2" green squares
3.  (3) 2 3/4" green squares
4.  (1) 2 3/4" background square
5.  (8) 2 x 3 1/2" light background rectangles
6.  (4) 2 x 5" rectangles
7.  (5) 1 3/8" squares of background light fabric and then cut diagonally once.


Make Your Center Shamrock block


You can see how snowballing the corners will make the shamrock shape

Lay your small triangles, right sides together as shown and then press open and trim square to be 2 3/4".  Note the black arrows how to lay the little triangles onto the square.  Also note in the picture, the red square shows that when you lay the triangle down the corners will stick out from the background a bit.  For my stem I used my bias tape maker but you could just cut a one inch strip and press the sides in 1/4" on each side.  When you press it, you can curve it a bit if you want to.

Next you will lay out all the parts and sew into sections
2" squares make the chains except the corner squares are 3 1/2" and the verticle light longer ones are
 3 1/2 x 2"


As you sew the pieces into sections, keep in mind how you will sew the sections together

This makes a 17" block (unfinished)

Quilt and Bind as desired.  Trying out some of my quilting software but then added some free motion on the shamrock and a bit around as you can see below

Wishing you a Lucky Year!


Monday, March 13, 2023

Shamrock Accessorizing: Pillows and Long Table Runner


I made these pillows using my tutorial for the shamrock block. 


I did some swirl free motion quilting on my domestic sewing machine.


 Add 2" strips for borders which gives you a 15 1/2" block.  

For the back of the pillow cut two pieces.  Cut (2) 15 1/2 x 10".    Also cut (1) strip coordinating fabric 15 1/2 x 2"   Hem one 15 1/2" side by folding over 1/2" and stitch down.  On the other backing piece sew the coordinating piece (which you have folded in half lengthwise and pressed) and sew to edge of the outside piece with right sides together.  Sew these as shown  to the pillow front, with right sides together and then flip right sides out through the opening.  Sorry no picture but ask if you need more explanation.  Note:  I also made my own pillow by sewing two 15 1/2" squares together leaving a 4" inch opening.  Turn right side out and fill with little scraps of batting and trimmings and some polyester fill and then stitch the opening closed.

Here's a long runner I made with six shamrock blocks.  I made a colorful border by adding 2" squares of green which alternated with white 2" squares, on top and bottom.  I did this before sewing the blocks together.  Of course, the end blocks also have a side border also.


My new quilting program has a shamrock and a leaf pantograph, so was able to use that for the quilting.


Here are some shamrock blocks.  The blocks are 12 1/2"

Here's the screen for the shamrock pantograph

Hope you make something fun for St. Patrick's Day and don't forget to wear green!


X O X O

I've already packed up nearly all the Valentine's decor so wanted to finally get all my Valentine posts completed.  I wanted a small...