Tuesday, May 31, 2022

Gallantly Streaming Quilted Flag Table Runner with Flag Block Tutorial

I'm in love my new Gallantly Streaming Flag Runner


I later added more quilting since it was sort of puffy with just this many wavy lines and I wanted it to lay flat.

SCRAPPY FLAG BLOCK TUTORIAL
The unfinished flag block is 15 1/2 wide x 11 1/2" tall

Start by making a 6 1/2" unfinished sawtooth star

    FOR EACH STAR BLOCK, CUT:
Cut:
One square 4 1/4”(blue) 
Three squares 3 1/2” (white)
Four 2" squares (blue)  
Make two diagonal cuts in two of the 3 1/2" white squares and also the blue 4 1/4" square as shown. 

LAY OUT AS SHOWN


MAKE THE FLYING GEESE BY SEWING THE WHITE TRIANGLES ON AS LAID OUT
TRIM THE FLYING GEESE UNITS TO 3 1/2" x 2" as shown,  (I love this no waste method)


Sew the sections together

SEWING THE STRIPES
The shorter stripes are 9 1/2 x 1 1/2".  The longer stripes are 15 1/2" x 1 1/2". 
For each flag block, cut:
Three red 15 1/2 x 1 1/2" strips
Two white 15 1/2 x 1 1/2" strips
Three red 9 1/2 x 1 1/2" strips
Three white  9 1/2 x 1 1/2"strips

 Sew the short strip sets together as shown and then sew to the star block.  Sew the long strips together as shown and then sew to the star/stripe unit.  Trim to 15 1/2 x 11 1/2"

BORDERS AND SASHING
For my runner I added 1 1/2" x 11 1/2" sashing and side strips and the top and bottom borders are 2 1/4" by length of my runner.

DON'T FORGET YOUR LABEL 
I love to see my labels on the backs of my projects as I take them out for each holiday.  It's fun to see the date and remember back to the construction!

Thursday, May 26, 2022

Land that I Love Pillow with Tutorial

My sewing group is going to make a patriotic pillow tomorrow.
I designed this pillow and made some kits and will include a tutorial for all of us to follow and hope you will join in too!

You will need about one yard total of red, white, and blue fabrics. Scraps, remnants, or precuts will work or get some fat quarters.  You will also need six buttons and a piece of muslin or scrap fabric and a piece of batting  18 1/2" square to make the quilt sandwich
  
Cutting instructions for the Heart Block:
Heart colors:  Cut seventeen 2 inch squares in your choice of fabrics for the heart.  Cut two 2 1/2" squares and cut diagonally once.
Background:  Cut one 5" and one 2 1/2" and one 2" square of background fabric and then cut those squares in half diagonally once.  (note you will only use one of the small white triangles from the 2 1/2" square)
Cutting instructions for the borders


Cutting instructions for the pillow back.
For the Pillow back, cut one piece 10 1/2 x 18 1/2" and one piece 9 3/4 x 18 1/2".  Also cut an accent piece 3 x 18 1/2"

Assembling the Heart Block:
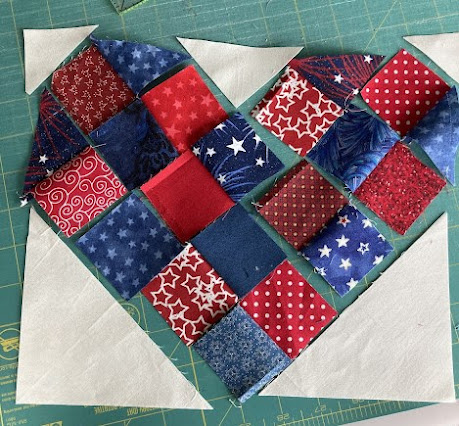
Lay out your pieces into the heart shape.  I started by sewing TWELVE of the two of the 2" squares together, two at a time and laying out again.  Sew FOUR of the 2 inch squares to the colored triangles as shown.  Keep laying out so you can see how they should be sewn together.

I kept sewing them together.  Note:  Be sure to square up each time you sew a seam so it will come out the correct size at the end.  Two squares by two squares will square up to be 3 1/2" square.  Two by 3 squares will be 3 1/2 x 5" rectangle.  Nine squares sewn together will be a 5" square.  Note:  Of course where there is a rectangle, it won't be a whole square.

 
After sewing all the 2" squares, the setting and corner square triangles together, sew on the lower triangles to create the block.  Square up the block to be 8" tall by 8 3/4" wide.


Here I am showing that when you square up your block, to try and make sure the bottom point of the block is centered along the same line as the "V" at the top.  In my case the heart is 8 3/4" wide, so the center is 4 3/8".  See red arrows.

Adding borders:
I free motion embroidered some patriotic words onto the border pieces (put a piece of muslin behind) before attaching to the heart block but now I think I would have preferred to wait and just do the words as part of the free motion quilting after the top was all assembled.  After these first borders are added, square up to 12 1/2 x 12 1/2"

Adding the Final Borders:

Sew two sets of four 3 1/2" blocks together and sew to opposite sides of the block, then sew two sets of six 3 1/2" blocks together and sew to the final sides.  Block should measure 18 1/2".  
Make a Quilt sandwich using the muslin and batting, if you would like to freemotion quilt it.  Sew on accent buttons
 
Assembling the Back (note using different fabric from what I showed in the cutting instructions)
Fold the 3 x 18 1/2" accent piece in half and press, then sew to the 10 1/2 x 18 1/2" piece along the 18 1/2" lengths.  Press and top stitch.  For the 9 3/4 x 18 1/2" rectangle, fold down 1 1/2" down and stitch a hem.  Make button holes in the accent piece 5" from the sides.  (Note in the picture I'm showing 4 1/2" but 5" will be better.)  Lay the piece with accent over the hemmed edge and baste overlapping edges together.  It should be 18 1/2" square.  Make a little dot on the hemmed edge inside the button hole and sew on the button.

Place front and back, right sides together and sew around the perimeter.
  Turn to right side through the buttoned opening and place an 18" pillow inside.


I love the United States of America and am thinking and honoring all those who have perished while serving in the United States Military, as well as those friends and loved ones who have passed on.  I hope you enjoy this wonderful holiday of thoughtfulness and gratitude.

Maple Leaf Block Instructions

To make the 9 1/2 inch maple leaf blocks:   Some basic instructions HSTs cut each, background and color 3 7/8” squares (cut diagonally once)...