Merry Christmas Corner! A Place to share ideas and work on Christmas Projects throughout the year!
I got a few things accomplished this month. Have you started thinking about Christmas sewing yet? Seven months to go.
 |
| Cathy of A Quilting Chick has been hosting this encore quilt along with permission from the original designer and blogger, JULIANNA GASIOROWSKA of Sewing under Rainbow who held the Last Minute Quilt Along last year. A paper pieced angel is due for June. Note: If you visit her blog, you'll see the words are in Polish, but she provides an English translation below each paragraph. It's fun and free! Also on Julianna's blog, I found a button for another free Christmas Quilt Along starting on July 8th with just 3 blocks (made 3 times) and it's so cute I'm planning on joining in so stop back on July 25th to see my version! Here's the button and sample:  Here's the link to the Fat Quarter Shop with more details. |
Linking up with Crazy Mom Quilts
Read on for the tutorial!
Merry Christmas Deer!
Tutorial
Step 1. Cut out the pieces.
2 x 6 1/2" 6 1/2" x 11" 1 1/2 x 2 1/2" 2 x 1 1/2" (2) 2 x 1"
2 1/2" square 2 x 3" 3" square 1 x 4" (2) 1" Squares
4 x 4 1/2" 1 x 2 1/2" 2 x 3 1/2" 1 1/2 x 4"
2 x 5 1/2" (9) 1" squares (2) 2 x 3 1/2" 1 1/2 x 5" Nose 1" square
4 1/2 square (7) 1 1/2" squares 1 x 2 1/2" 1 x 4 1/2"
(2) 3 x 3 1/2" 3 x 8 1/2" 1 1/2 x 3" 2 1/2" square Chest 2 x 4"
5 x 5 1/2" (opt. spotted)
(5) 1" squares
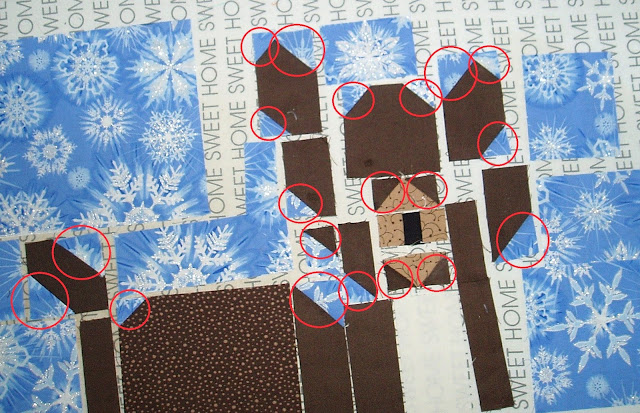
Step 2. Mark a diagonal line on 1 1/2" and 1" background and on 1" dark brown squares
Step 3. Sew all squares on diagonal lines to angle the corners as shown.
Place square on delegated corner. Sew along the diagonal line. Trim leaving 1/4" seam. Press back.
For the ears, sew the 1 1/2" background square on first and press back, then sew the 1" background on opposite corner.
Note that all circled sections have a square sewn on the diagonal to angle each corner.
Step 4. Sew muzzle together -- square up to 2 1/2".
Sew chest area together -- square to 3 1/2 x 4".
Step 5. Sew right cheek to background -- square to 3 x 4 1/2". Sew right ear to background -- square to 3 1/2 x 4 1/2".
Sew forehead to background and square to 3 x 4 1/2".
Step 6. Sew chin on to bottom of muzzle and then sides to muzzle. Square to 3 x 2 1/2"
Step 7. Sew right ear section to right cheek section and square to 4 1/2 x 6". Step 8. Then sew right ear/cheek section to background section and square to 4 1/2 x 10".
Step 9. Sew background to left cheek -- square to 2 x 2 1/2" and then sew to left ear section.
Step 10. (Sorry this is a little tricky because it's a partial seam). Sew small corner cheek piece to chest, but only half way (red arrow shows where to stop).
Then sew to 1 1/2" body section as shown.
Step 11. Sew Corner cheek/chest piece to cheek ear section.
Step 12. Sew forehead section to muzzle section.
Step 13. Sew center face to left ear/check section, carefully folding back the chest piece, exposing the unsewn area. See diagram.
Step 14. Now sew the chest area to chin side of center face section. Trim to 4 1/2 x 10"
Step 15. Sew face /chest section to right ear section. Trim to 8 1/2 x 10"
Step 16. Sew background to main body and trim to 5 1/2 x 6 1/2". Sew 2 1/2" background to tail and trim to 4 1/2 x 2 1/2. Sew buttock to background and trim to 4 1/2" square.
Step 17. Sew buttock to tail and then buttock/tail section to body.
Step 18. Sew remaining background pieces on and then sew head and body sections together.
Finish with embroidery or buttons for eyes and sew into the project of your choice.


3 comments:
Whoa! That's a lot of pieces and a lot of work but it sure is cute and what a treasure at Christmas.
Beautiful blocks! Thanks for your lovely words to my kaleidoscope quilt :o)
Love Mrs Patch
You are making such beautiful projects for Christmas!
I will try to make the Merry Christmas Deer! It is super cute!! Sew 'deer' !
I happen to have blue snowflake material, too, to use in the background, like yours!
What a beautiful post.... I hope to make a few more Christmas items, too. You are my inspiration.
Susie
Post a Comment