Tuesday, September 17, 2019

Maggie's Quilt

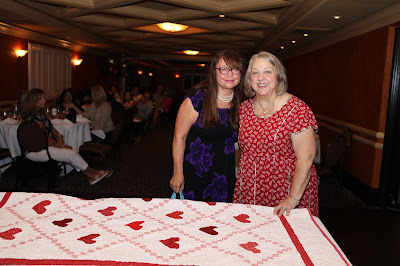
Our wonderful manager, Maggie, is retiring soon.  Of course since our tradition is to give a quilt to the retiree, I had to come up with a plan.  The quilt design was to symbolize our love for her!  We had a nice dinner, a skit, and some dance numbers, all put on by my wonderful talented coworkers!

One of my coworkers is a professional photographer, hence the photos (and videos).  And one is an artistic cookie baker and she made "quilted" cookies to go with the theme!  It was a memorable night!
Here are a few photos of the quilting and quilt under construction.

I made a tutorial for the heart and chain blocks here, in case you want to make one like this.


Maggie's Quilt Tutorial


I recently completed Maggie's retirement quilt.  Here is a tutorial for the blocks I used although, warning, the instructions are written from memory, and haven't been tested.
For this quilt, make:
a) 25 heart blocks and 21 chain blocks.  
b) 16 half chain blocks
c) 12  4 1/2 x 7 1/2" plain background blocks that go between each 1/2 chain blocks 
d) (4) 4 1/2" background squares for the corners.

Heart Blocks
Cutting instructions:
(1) 4 1/2 x 2 1/2"
(1) 2 1/2 x 2 1/2"
(2) 3 1/2" square cut diagonally
(1) 2 1/2" square cut diagonally (bigger one to be used in center as shown and the other to be cut in half again as shown)
For the borders cut two of each: 2 1/4 x 5" rectangles and 1 3/4 x  7 1/2" rectangles
Lay out as shown
1.  Sew smallest triangles on first
2.  Sew one middle size triangle to 2 1/2" square
3.  Sew 2 1/2" square unit to 4 1/2 x 2 1/2" unit
4.  Sew large triangles on as shown
Next you will lay your ruler onto your square, making sure the 2 1/2" line is centered.
Then you will slice off a bit of the side and top heart, leaving 1/4" seam allowance at the bottom.  Flip around and trim to 4 1/4" (top to bottom) x 5" across
This will give the heart a bit more roundness
Add the borders.  Top and bottom are 2 1/4 x 5" rectangles and sides are 1 3/4 x  7 1/2".  Square up the block to be 7 1/2" square


Chain Blocks

1.  For the chain blocks, cut many 1 1/2" x the width of the fabric (wof) of main fabric and also many 1 1/2" x wof of background fabric (not shown)

2.  Also Cut many 3 1/2" and  5 1/2" x wof, strips of background fabrics


3.  For the HALF chain blocks, also cut 2 1/2" and 4 1/2" x wof background strips

1.  Sew all of the 1 1/2" strips of your main color and background strips together as shown.

2.  Slice these strips into 1 1/2" pieces
Assemble the center 9 patch and then add two layers of borders.
1.  Construct the center 9 patch as shown (you will need 1 extra 1 1/2" square of main color)
2.  Add a 1 1/2" x 4 1/2" strip to the side of the 9 patch as shown
3.  Add the corresponding pieces to each side as shown.
I press to one side but open as shown to reduce the bulk where the four seams meet.  Sometimes, often actually, I have to clip the seam to achieve this.

First layer of border

Second layer of borders
After adding the second layer borders, square up to 7 1/2"
Construct the half chain blocks similarly to the main chain blocks, except, leave off the last section of the middle 9 patch and the side background strips will be 2 1/2 and 4 1/2"

Sew all the blocks together.
For finishing the quilt top, I added a background border of 1 1/2" and then the red border is 2" and then another 6" background border.

These instructions haven't been tested, so if you run into a problem, you need clarified, email me at sunshineintheattic@yahoo.com and I'll get back to you as soon as I can.  Also if anyone makes one of these quilts or you put your own spin on it, I'd love to see it!

Sorry I don't have the exact yardage, but I think the background is about 4 yards and I used a charm pack and some stash fabrics for the hearts.  The chain block main fabric was about 1 1/2 yards.


Tuesday, September 3, 2019

Quilters Meet and Greet

Welcome to my stop on the 2019 Meet & Greet!  I really love being part of the online quilting community and am happy to join with Benita who organized this!
Click the picture above to see all the wonderful quilts and participants!
I've been quilting since October of 2010, but it was NOT my intention to become a quilter (having already too many hobbies, in my opinion) but a friend introduced me to the rotary cutter and the classic maple leaf block made with half square triangles, and I could not resist going out immediately and buying my own rotary cutter and mat and have been an avid quilter ever since!

    I made this quilt for my friend's daughter who loves Vincent Van Gogh's Starry Night:
I'm delighted to see the hundreds of scrappy 2 1/2" squares, constructed of a multitude of  blue hues and tones, draw the eye into the swirling pattern of stars and then focus on the large center lone star.

  Click here for original post.
And here are a few more favorites!  I love the challenge of designing something unique and special for each quilt recipient.
I really love how patriotic this quilt is with the center eagle medallion, the gold flying geese, the white stars, and various sizes of flying geese that create the chevrons and star burst effect.   The mitered corners were a bit challenging but worth the effort!

For a patriotic coworker who retired.  Original post here.
This is one of my first quilts and love the rainbow of squares and hearts!  It was made for my daughter.


Another quilt made for a retired friend.  She picked a charm square pack which lent itself to the color and simple patchwork on point and flower vine borders.

This one was gifted to my childhood friend and particularly love it because of the patriotic theme and embroidered phrases on each side.
Evie's Quilt.  This quilt was a collaboration of ideas with Evie and myself and I would have never thought to make this quilt, but I love how it turned out.  I wish you could see it in person as the photo does not do it justice.  The panel and fabrics are elegant with gold metallic accents and the creamy white has a shimmery finish.
I got pretty creative with the quilting on the latest retirement quilt for my manager, Maggie.


Thanks for visiting!
Be sure to enter for the Great Grand Prize!

Maple Leaf Block Instructions

To make the 9 1/2 inch maple leaf blocks:   Some basic instructions HSTs cut each, background and color 3 7/8” squares (cut diagonally once)...