Thursday, March 25, 2021

March Christmas Corner March 2021

So happy to finish this table runner started back in 2019 


I joined a quilt along by Julie at the Intrepid Thread and pieced together the runner in 2019

I added trunks to my trees


The Tilda fabrics are so pretty.  I think you can still get the pattern if you sign up at the link above.

Linking up with Needle and Thread Thursday  Confessions of a Fabric Addict, Alycia Quilts, From Bolt to Beauty Peacock Party

Monday, March 22, 2021

Brianas Spot

Briana's Projects

She finished this project last week without any help!


She even added a pocked to the back of the pillow!


Next she's making a little quilted basket


Cute little place mat (I showed before)

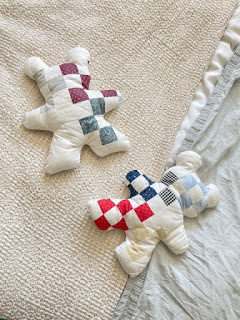
Cute little bear (also showed before)

Then she made a second little bear all on her own


Little cutie having fun!


 Linking with Needle and Thread Thursday

Sunday, March 21, 2021

Wonderful Spring and Easter

Time to Pack up St. Patrick's Day projects and Decor
I have a bin ready to load things up.  You can see my painting in the background which I will keep out to work on.

My Double Irish Chain Quilt is coming along.


Each square is a 25 patch of two inch squares so comes out to 8" unfinished blocks.
The white blocks have light green squares at each corner and the green blocks have a 9 patch and then a border of a white square with light green squares on each side and then the outside corners are dark green.


I'm going to add more bright greens and make the white squares with less tan colors.


I've been making a little progress on the Clover quilt but may pack it up until next year.  Time to sew for Easter and spring.


I started this long ago but my quilting wasn't so good and my plan is to pick out the existing quilting and I damaged at least one of the cream color squares with picking out, so need to replace and then add a big border and finish it for an Easter table topper.

Pretty Rainbow from April 5, 2020


Two tiny baby hummingbirds in our yard a couple weeks ago.  You can see the eye and beak of one and the sibling is right next to it but not as easy to see. The eggs were the size of mini jelly beans

Linking with Quilting is More Fun that Housework   Wendy's Peacock Party From Bolt to Beauty, So Scrappy and Confessions of a Fabric Addict   I keep finding more link parties so might as well join!  Next is Live Laugh Quilt

Saturday, March 13, 2021

Last Minute Scrappy, St. Patrick's Day, Mini Wall Hanging with Tutorial

With St. Patricks Day just a few days away, here's a little project to complete in a day.

Started last night and completed today.


The plan was to make a shamrock but as I started laying out the squares and triangles, I saw a heart appear and then there were four hearts!  Can you see them?


Here's the tutorial in case you want to make one too.
Lay out your (20) two inch, green squares, (9) two inch background and (8) two inch half square triangles (HSTs).  Note:  I made my HSTs with a 3 1/2" square of green and background sewn together around the perimeter and then sliced diagonally twice which gives you four.

You will also need setting triangles and corner square triangles.  Make setting triangles by cutting a 3 1/2" square diagonally twice from background fabric.  Make four setting triangles (the corner ones) are 2 1/2" squares cut diagonally once.

Start sewing into sections as shown

Square up to 11 1/2".  Ready for borders.


Add any size borders you like.  Mine are 1 3/4 x 11 1/2" with 1 3/4" corner stones.  Quilt as desired.


I quilted it with diagonal lines along the seams and some swirls in some of the white squares and along the border.  Ready for binding.

BEFORE sewing on the binding, Don't forget to add some triangles on the back for ease of hanging!

To hang on a little quilt stand or on a dowel (which will hang easily on the wall, from a push pin) make two 3 1/2" squares and fold diagonally and pin the raw edges to upper corners before binding (I took the photo afterwards).  When you bind the quilt, the triangles will be sewn into place.


Maple Leaf Block Instructions

To make the 9 1/2 inch maple leaf blocks:   Some basic instructions HSTs cut each, background and color 3 7/8” squares (cut diagonally once)...