 |
| I quilted it with and E2E from My Creative stitches, called Beloved |
 |
| It was my birthday a few days ago and my friend, Cheryl gave me this darling birthday cake! |
 |
| I quilted it with and E2E from My Creative stitches, called Beloved |
 |
| It was my birthday a few days ago and my friend, Cheryl gave me this darling birthday cake! |
 |
| I made a pillow cover for the pillow I'd made for the Scrappy Cats for Fall pillow cover I made last halloween |
 |
| I prefer this shape of a V so cut the angles as shown and I like how it turned out. I made a template to keep for future use. |
 |
| I don't usually quilt the back of my pillow covers, but I wanted to try this free pantograph from My Creative Stitches, called Elizabeth. She has lots of beautiful designs and lots of sales. |
 |
| For the front, I used This is a free pantograph from Urban Elementz. Rose |
 |
| white board |
 |
| more white board art |
 |
| Three rows of the nestled hearts made it about 54" square |
 |
| I made one for me also, but just one row to fit this desk area. It is about 18 1/2 x 60" |
 |
| Quilted with an E2E design from My Creative stitches, called Beloved |
 |
| Another way to create the template is to use this Easy Angle ruler if you have one, which builds in the 1/4" seam allowance. You can also use it on the top corners. |
 |
| Showing how it looks laying along side where it will be sewn |
 |
| If you want to cut them out quicker, you can cut a 4 inch square in half diagonally, twice. I love saving time and fabric. |
 |
| You can see the middle is sewn together into a unit |
 |
| Then start sewing the units together. |
 |
| Quilt as Desired |
 |
| Getting the binding prepared |
 |
| Wow, I had so many drafts of unpublished posts, but I guess I'll post anyway even though Christmas is over for now. |
 |
| I put gold satin on the back which turned out so pretty, it's reversible! |
 |
| I started this a few years ago and the way you cut it, you end up with strips for two |
 |
| It's so nice to finish up projects especially after a few years or more! |
 |
| Baby quit all done. I wasn’t so happy to see that dark block in the picture but the baby likes his quilt and it's not quite so noticeable in person. |
 |
| You'll need 25 charm squares of lighter and 25 charm squares of darker fabrics for the Hour glass blocks (or can use 7" squares so you'll need half as many). Cutting instructions. Cut a 5" block diagonally once or a 7" block diagonally twice. Sew lights and darks together as shown. |
 |
| The setting triangles are cut diagonally twice from a 9 5/8" square. I'll update for the corner square trianges later, when I find my notes. I used Twinkle, Twinkle little Star print. See Audrey's baby quilt for the star corner tutorial. |
 |
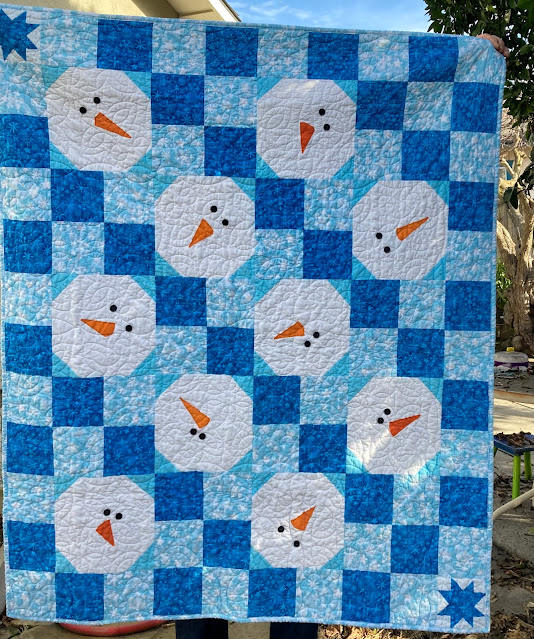
| I started this Snow man Quilt many years ago and finally finished it up in January. Maybe I can get this post published before the blazing sun warms us up for summer, lol. |
 |
| It was so frozen out that day that even the weeds took on a delightful shimmering sparkle! Not quite as enchanting through the screen though. |
 |
| Snowmen and 4 patch blocks I found this many blocks but luckily had some of the light blue snowflake fabric and just a little of the dark blue snowflake fabric left to make the remaining blocks. I laid on some buttons and noses to see how cute they'd be |
 |
| I made the rest of the blocks but not quite enough of the dark blue for the final corner blocks so innovated with the two corner star blocks which turned out to be a special touch |
 |
| I was up hiking my favorite route when I saw these two. The big guy was over 7 feet tall and his baby had fallen against him but still so cute! |
 |
| Quilted with giant snowflakes |
 |
| Getting ready to sew on eyes |
 |
| I put this snowflake fleece on the back with batting inside too, so it's extra cozy! I have some notes jotted down somewhere with the dimensions for the blocks so will update the post when I come across them. |
 |
| Winter painting |
 |
| I'll work on this more next year |
 |
| I put some winter art on the White board at work for the patients to enjoy in the recovery room. |
 |
| I made this winter topper a few years ago and finally put the binding on in January too! My friend, Donna, sent me the darling tray and winter decorations! It was rewarding and less depressing to have something pretty to put out after the Christmas decorations were all taken down. |
I used winter-y fabrics to make this pattern from She Can Sew. It's called Super Star and this is the link Quilted with snowflakes ...
